Create App manually
In the actual production scenario, you do not need to do this.
You will be able to Create an App from Team management,
and you only need App id and App token
1. Prerequisites
✅ Install Java 17+
Check if Java is installed:
java -version
If not installed:
- macOS:
via terminal
brew install openjdk@17 - Windows: Download from Adoptium Temurin 17.
✅ Install Gradle
Gradle is needed to manage dependencies.
Check if installed:
gradle -v
If not:
- macOS:
via terminal
brew install gradle - Windows:
Use Gradle Installer or
choco install gradle.
✅ Install IntelliJ IDEA
Download IntelliJ IDEA Community Edition from: 👉https://www.jetbrains.com/idea/download IntelliJ is used for Kotlin/Gradle development and to run the bot easily. This demo uses this tool Or You can use any other equivalent
✅ Create a Team and User
Enter Team settings: https://wire-teams-dev.zinfra.io/
And get the following details Wire Email Wire Password Wire User ID Staging Domain : staging.zinfra.io
Now You are 50% Done!
Next Steps - This example is in Kotlin
2. Create a New Kotlin Project
- Open IntelliJ → New Project
- Choose:
- Language: Kotlin
- Build system: Gradle (Kotlin DSL)
- JDK: Temurin 17
- Name your project, e.g. TestApp
3. Configure Gradle Build
Open build.gradle.kts and replace everything with:
plugins {
    kotlin("jvm") version "2.2.20"
}

group = "org.example"
version = "1.0-SNAPSHOT"

repositories {
    mavenCentral()
}

dependencies {
    implementation("com.wire:wire-apps-jvm-sdk:0.0.17")
}

tasks.test {
    useJUnitPlatform()
}
kotlin {
    jvmToolchain(17)
}
Then click the "Load Gradle Changes" popup
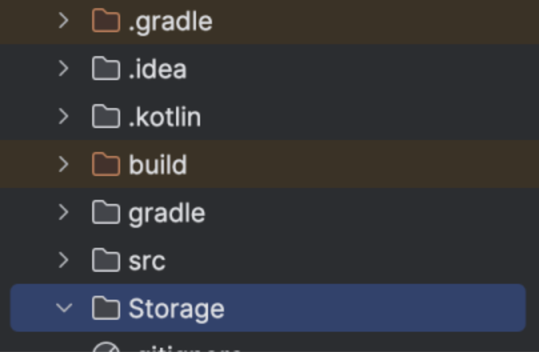
4. Create a Storage Directory
Click on + icon and create a Storage Directory

5. Create Your Kotlin File
In IntelliJ:
- Navigate to:
src/main/kotlin - Right click -> New -> Kotlin Class file - Name as Main.kt
Go to
main.ktand the copy the below Kotlin code for the simple echo app
import com.wire.sdk.WireAppSdk
import com.wire.sdk.WireEventsHandlerSuspending
import com.wire.sdk.model.WireMessage
import java.util.UUID
fun main() {
    val wireAppSdk = WireAppSdk(
        applicationId = UUID.randomUUID(),
        apiToken = "myApiToken",
        apiHost = "https://staging-nginz-https.zinfra.io",
        cryptographyStoragePassword = "myDummyPasswordOfRandom32BytesCH",
        wireEventsHandler = SampleEventsHandler()
    )
    wireAppSdk.startListening()
}
class SampleEventsHandler : WireEventsHandlerSuspending() {
    override suspend fun onMessage(wireMessage: WireMessage.Text) {
        val message = WireMessage.Text.createReply(
            conversationId = wireMessage.conversationId,
            text = "echoing ${wireMessage.text}",
            originalMessage = wireMessage,
            mentions = wireMessage.mentions
        )
        manager.sendMessage(message)
    }
}
Run this to create main.kt configuration file
6. Configure Environment Variables
Go to:
- Current File on the top
- Click on the 3 dots
- Run with parameter
- Click on Edit environment variables
WIRE_SDK_USER_ID=abcd-1234-efgh-5678
WIRE_SDK_EMAIL=your_email@domain.com
WIRE_SDK_PASSWORD=dummyPassword
WIRE_SDK_ENVIRONMENT=my.domain.link

6. Run the App
Click the green play ▶️ button beside fun main() in IntelliJ
7. Use the App
- Log in as a different user https://wire-webapp-dev.zinfra.io/
- Create a Group
- Add App into that Group
- Invoke the App
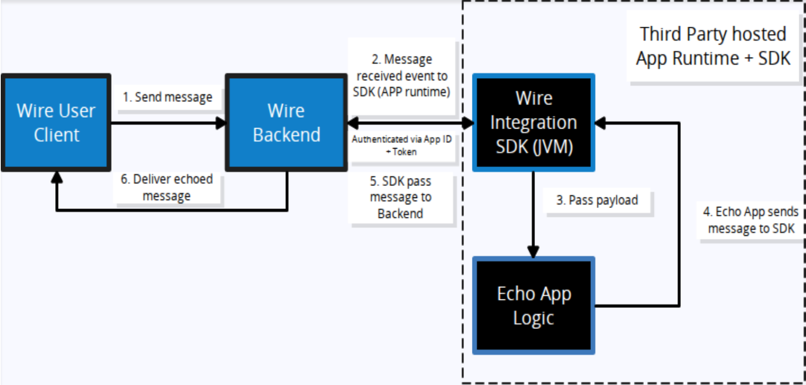
Your First Echo App should Echo the message back!
